


Unlock the full potential of your Mac with Homebrew—the essential package manager for macOS.
Table of Contents
- Introduction
- Prerequisites
- Step-by-Step Installation Guide
- Verifying the Installation
- Troubleshooting Tips
- Conclusion
- Additional Resources
Introduction
Homebrew is a free and open-source package manager that simplifies the installation of software on macOS. It allows you to install, update, and manage software packages from the command line, making it a must-have tool for developers and power users alike.
With Apple’s transition to their own silicon chips—M1, M2, and the latest M3—the installation process for some software has changed slightly. This guide will walk you through the quick and easy steps to get Homebrew up and running on your Mac equipped with these chips.
Prerequisites
Before you begin, ensure you have the following:
- A Mac with an M1, M2, or M3 chip.
- An active internet connection.
- Basic familiarity with using the Terminal app.
Step-by-Step Installation Guide
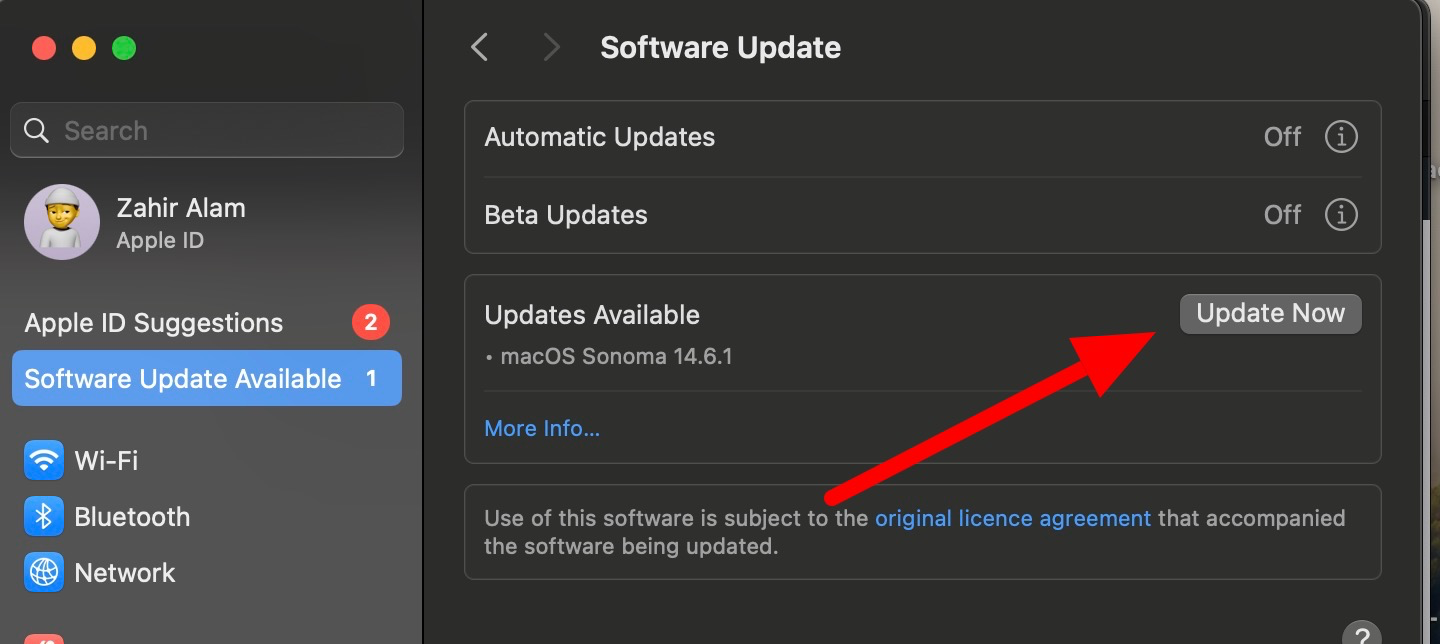
1. Update macOS
It’s essential to have the latest version of macOS to ensure compatibility.
- Click on the Apple menu () in the top-left corner.
- Select System Settings (or System Preferences).
- Click on Software Update.
- If an update is available, click Update Now and follow the on-screen instructions.

2. Install Xcode Command Line Tools
The Xcode Command Line Tools provide essential developer tools needed by Homebrew.
- Open the Terminal app. You can find it via Spotlight Search (⌘ + Space) by typing “Terminal.”
- In the Terminal window, run:
xcode-select --install- A software update popup will appear. Click Install and agree to the terms when prompted.
3. Install Homebrew
Now you’re ready to install Homebrew itself.
- In the Terminal, enter the following command:
/bin/bash -c "$(curl -fsSL https://raw.githubusercontent.com/Homebrew/install/HEAD/install.sh)"- Press Enter. The script will explain what changes it will make and prompt you for confirmation.
- When prompted, enter your Mac’s admin password to proceed.
- The installation script will automatically detect your Mac’s architecture (M1, M2, or M3) and install Homebrew in the appropriate location (
/opt/homebrewfor Apple Silicon Macs).
To ensure your system recognizes Homebrew commands, you need to update your shell configuration.
4. Configure Environment Variables
1. Determine which shell you’re using by running:
echo $SHELL- If the output is
/bin/zsh, you’re using Zsh (default for macOS Catalina and later). - If it’s
/bin/bash, you’re using Bash.
2. For Zsh users run:
echo 'eval "$(/opt/homebrew/bin/brew shellenv)"' >> ~/.zprofile
eval "$(/opt/homebrew/bin/brew shellenv)"3. For Bash users run :
echo 'eval "$(/opt/homebrew/bin/brew shellenv)"' >> ~/.bash_profile
eval "$(/opt/homebrew/bin/brew shellenv)"Verifying the Installation
To confirm that Homebrew is installed correctly:
- In Terminal, run:
brew --version- You should see output similar to:
Homebrew 4.3.19- Additionally, you can run a simple update to check everything is working:
brew updateTroubleshooting Tips
- Command Not Found Error: If you receive an error saying
brew: command not found, double-check that you’ve correctly updated your shell configuration as described in Step 4. - Permissions Issues: If you encounter permission errors, ensure you have the necessary rights to
/opt/homebrew. You might need to adjust ownership:
sudo chown -R $(whoami) /opt/homebrew- Xcode Agreement: Sometimes, you may need to agree to Xcode’s license agreements:
sudo xcodebuild -license accept- Rosetta 2 Requirement: Some older packages might require Rosetta 2 to run on Apple Silicon Macs. You can install it with:
softwareupdate --install-rosettaConclusion
Congratulations! You’ve successfully installed Homebrew on your Mac with an M1, M2, or M3 chip. You now have access to thousands of open-source packages that can enhance your productivity and streamline your workflow.
Example Usage:
- Install wget:
brew install wget- Search for a package:
brew search package-name- Upgrade all installed packages:
brew upgradeAdditional Resources
- Homebrew Documentation: docs.brew.sh
- List of Available Packages: formulae.brew.sh
- Homebrew GitHub Repository: github.com/Homebrew
For any issues not covered in this guide, refer to the Homebrew Troubleshooting page or seek help from the Homebrew community.
Empower your Mac with the versatility of Homebrew and take your macOS experience to the next level!
Why do people who write solutions for Macs use completely different operating systems and Apple Silicon processors than those on my iMac?
Whether or not I put sudo in front of the command line I get this error:
me@iMac ~ % sudo /bin/bash -c “$(curl -fsSL https://raw.githubusercontent.com/Homebrew/install/HEAD/install.sh)”
dyld[5201]: Library not loaded: /opt/local/lib/libiconv.2.dylib
Referenced from: /opt/local/lib/libidn2.0.dylib
Reason: tried: ‘/opt/local/lib/libiconv.2.dylib’ (mach-o file, but is an incompatible architecture (have ‘x86_64’, need ‘arm64e’ or ‘arm64’)), ‘/System/Volumes/Preboot/Cryptexes/OS/opt/local/lib/libiconv.2.dylib’ (no such file), ‘/opt/local/lib/libiconv.2.dylib’ (mach-o file, but is an incompatible architecture (have ‘x86_64’, need ‘arm64e’ or ‘arm64’))Library not loaded: /opt/local/lib/libiconv.2.dylib
Referenced from: /opt/local/lib/libpsl.5.dylib
Reason: tried: ‘/opt/local/lib/libiconv.2.dylib’ (mach-o file, but is an incompatible architecture (have ‘x86_64’, need ‘arm64e’ or ‘arm64’)), ‘/System/Volumes/Preboot/Cryptexes/OS/opt/local/lib/libiconv.2.dylib’ (no such file), ‘/opt/local/lib/libiconv.2.dylib’ (mach-o file, but is an incompatible architecture (have ‘x86_64’, need ‘arm64e’ or ‘arm64’))
Password:
I have installed rosetta, and also I have run Terminal using rosetta. Maybe my iMac is faulty. Or the OS is faulty. Either way I am extremely hacked off. This is the last Apple product I will buy and would not advise anybody else to waste their money on one. Apple used to make nice computers with reliable OS, now they make hyper expensive (but nice) computers with super buggy OS, and neither Apple Help nor the rest of the Internet can offer solutions that work. Apple have worked very hard to destroy their reputation and p155 off their customer base.
Hey, thanks for taking the time to write all that out – I’m really sorry you’ve had such a frustrating experience. When a “one-line” command explodes with a wall of errors, it’s annoying as hell, I get it.
Good news though: from the error you posted, this doesn’t look like your iMac is faulty or that macOS itself is totally broken. It’s most likely a conflict with an old MacPorts install, not Homebrew or the command in this guide.
This part is the key clue:
Library not loaded: /opt/local/lib/libiconv.2.dylib
Reason: … incompatible architecture (have ‘x86_64’, need ‘arm64e’ or ‘arm64’)
a) /opt/local is where MacPorts lives.
b) The dynamic linker (dyld) is saying: “I’m running as Apple Silicon (arm64), but the library I’m trying to load from /opt/local is Intel-only (x86_64).”
So curl can’t even start properly because it’s getting pulled into those old MacPorts libraries. That’s why the Homebrew installer fails before it even begins.
A few things to try:
1. Check your Mac’s architecture:
uname -m
If it prints arm64, you’re on Apple Silicon (M-series chip).
2. If you don’t actively use MacPorts, you can move it out of the way so it stops interfering:
sudo mv /opt/local /opt/local.intel-backup
(You can always move it back later if needed.)
3. Then run the Homebrew install command exactly like this (note the straight quotes and no sudo):
/bin/bash -c “$(curl -fsSL https://raw.githubusercontent.com/Homebrew/install/HEAD/install.sh)”
The quotes in your comment are curly “smart quotes”, which can also cause issues if copied directly into Terminal.
4. Also, for Apple Silicon I recommend running Terminal in native mode, not via Rosetta, when installing Homebrew.
This guide is specifically written and tested for Apple Silicon Macs (M1/M2/M3/M4).